How to Install NVIDIA Driver & Switch Between Intel Graphics in Fedora 39 |
您所在的位置:网站首页 › fedora nvidia prime › How to Install NVIDIA Driver & Switch Between Intel Graphics in Fedora 39 |
How to Install NVIDIA Driver & Switch Between Intel Graphics in Fedora 39
|
Contents:
Step 1: Enable RPM Fusion repository
Option 1: Enable RPM Fusion Repository via GNOME Software
Option 2: Enable RPM Fusion Repository via Linux Command
Step 2: Refresh System Repository Cache
Step 3: Install NVIDIA Driver
Option 1: Install NVIDIA driver via GNOME Software
Option 2: Install NVIDIA driver via Linux Command
Step 3: Switch between NVIDIA and Intel/AMD Graphics
1. Install EnvyControl
2. Switch graphic card via System Menu
How to Tell Which Graphics Card is in use:
Running Fedora on PC / laptop with NVIDIA graphics card? Here’s the step by step beginner’s guide shows you how to install the graphics driver and switch between the integrated Intel (or AMD) GPU. Installing graphics driver is one of the top things to do after installing an operating system. Unlike Ubuntu, Fedora Linux does not include NVIDIA driver package in system repository due to various reasons. However, a third-party RPM Fusion repository does. Step 1: Enable RPM Fusion repositoryRPM Fusion is one of the most popular software repositories for Fedora Linux. It has “Free” repository that contains most recent free open-software packages. And, a “Nonfree” repository that include proprietary software, such as NVIDIA driver and Steam. It’s third-party repositories that Fedora does not include out-of-box. But, it’s easy to enable them via a few clicks! Option 1: Enable RPM Fusion Repository via GNOME SoftwareFor Fedora Workstation with default GNOME Desktop, simply click on top-left “Activities“, then search for and open ‘GNOME Software’. 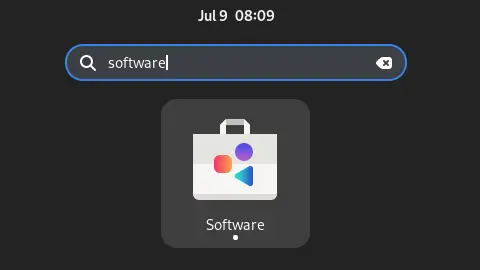 Open GNOME Software Open GNOME Software
When it opens, click the hamburger icon in right corner of header bar. Then, select “Software Repositories” in the pop down menu. 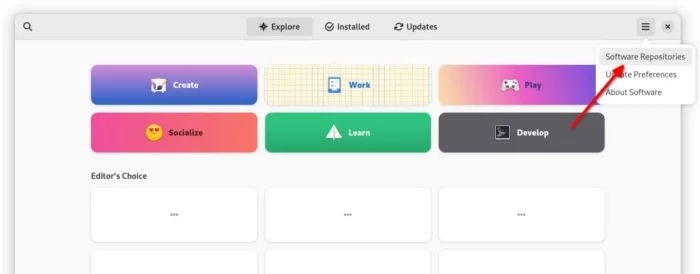 Open ‘Software Repositories’ manager dialog Open ‘Software Repositories’ manager dialog
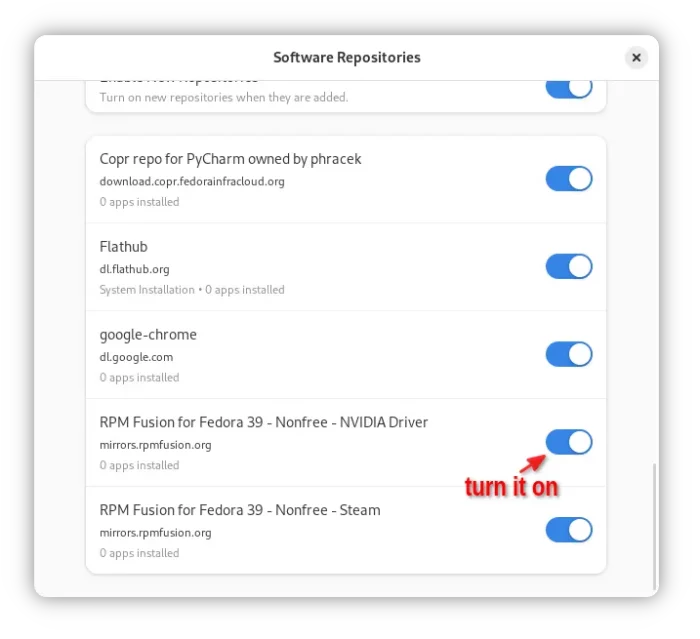
You can finally scroll down in next dialog, and turn on the slider icon for “RPM Fusion for Fedora 37/38 – Nonfree – NVIDIA Driver” to enable the repository.
In case you are NOT running on the default GNOME desktop, or GNOME Software somehow just not work. A single Linux command can do the job as choice. Firstly, search for and open terminal from either Activities overview or system start menu. 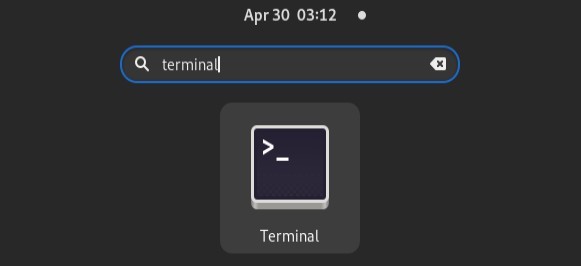 Open terminal Open terminal
When terminal opens, copy and paste the command below and hit Enter to add the repository: sudo dnf install \ https://download1.rpmfusion.org/nonfree/fedora/rpmfusion-nonfree-release-$(rpm -E %fedora).noarch.rpm NOTE: It's a SINGLE command, though separated into 2 lines.For choice, you may also add the Free repository for more software packages: sudo dnf install \ https://download1.rpmfusion.org/free/fedora/rpmfusion-free-release-$(rpm -E %fedora).noarch.rpm Step 2: Refresh System Repository CacheAfter step 1, you need to update the cache first before being able to install the packages from that repository. This can be done, either via GNOME Software, by navigating to “Updates” tab. It should indicate the process via a ‘Checking…‘ signal as well as the stop bottom in header bar. 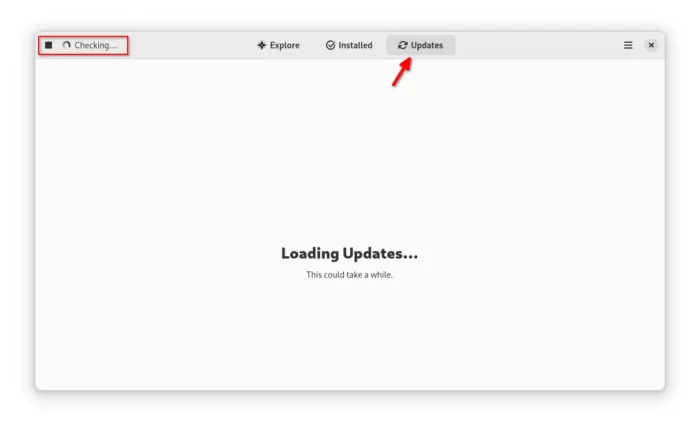 GNOME Software is checking updates GNOME Software is checking updates
Or, open terminal and run the single command below to do the trick: sudo dnf update --refresh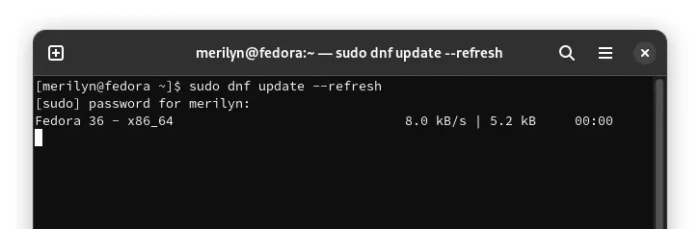 DNF command to refresh system software cache.
Step 3: Install NVIDIA Driver DNF command to refresh system software cache.
Step 3: Install NVIDIA Driver
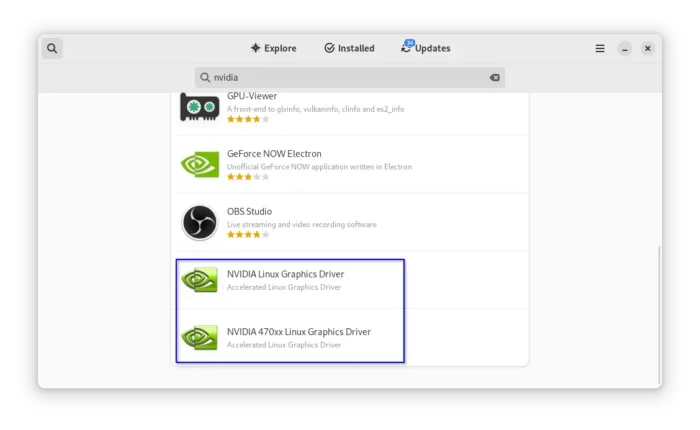
OK, you can now install the NVIDIA graphics driver! As well, there are two methods to do the job. Option 1: Install NVIDIA driver via GNOME SoftwareIn the first tab of GNOME Software window, click on top left search icon and then type to search “NVIDIA“. Then scroll down, select install either the most recent driver or legacy 470xx driver as you prefer.
For choice, you may either install the legacy NVIDIA 470 package, or the latest driver (515 at the moment of writing). The “Control Panel” package will be installed automatically along with the driver package. Option 2: Install NVIDIA driver via Linux CommandAlso for non-GNOME user or those prefer Linux commands, copy and paste the command below into terminal and hit run to install the packages: sudo dnf install akmod-nvidia xorg-x11-drv-nvidia-cuda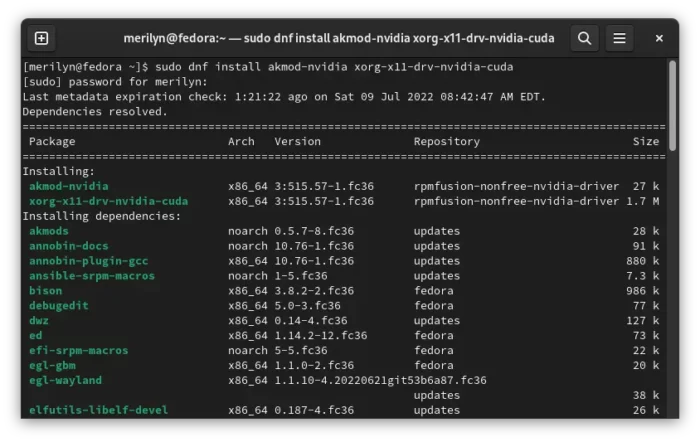 DNF command to install NVIDIA driver DNF command to install NVIDIA driver
After installation, restart your computer. If you want, open NVIDIA control center from either start menu or ‘Activities’ overview. 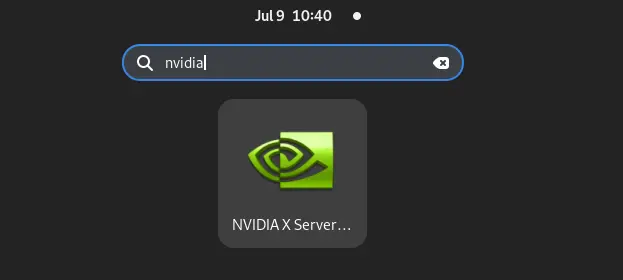 Open NVIDIA Control Panel
Step 3: Switch between NVIDIA and Intel/AMD Graphics Open NVIDIA Control Panel
Step 3: Switch between NVIDIA and Intel/AMD Graphics
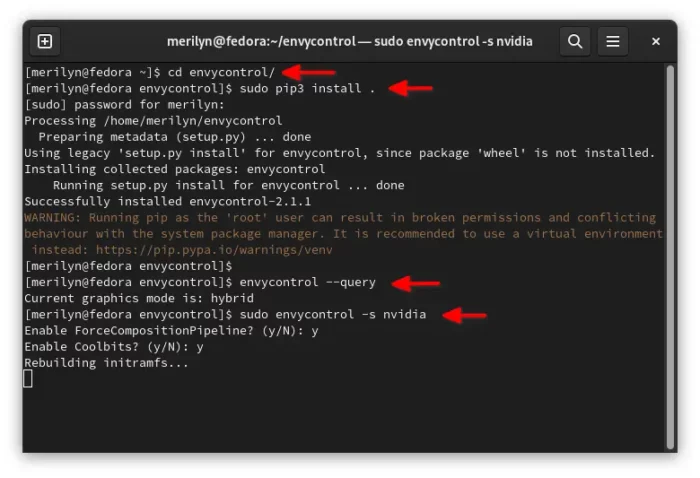
In my case, it uses the ‘Hybrid’ graphics mode by default after restart. And, there’s no option to select which graphics card to use in NVIDIA control panel. However, a Gnome extension as well as a command line are available to do the job. 1. Install EnvyControlEnvyControl is a program to provide an easy way to switch GPU modes on Nvidia Optimus systems under Linux. Firstly, open terminal from ‘Activities’ overview or start menu, then run command to grab the source: git clone https://github.com/geminis3/envycontrol.git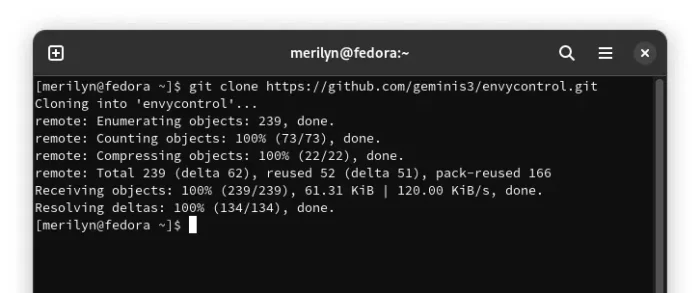 Download EnvyControl source code Download EnvyControl source code
Secondly, install Python pip tool in case you don’t have it via command: sudo dnf install python3-pip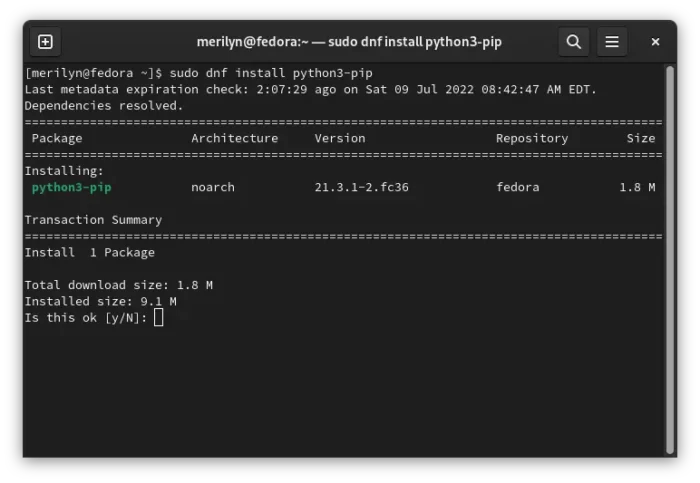 Install PIP Install PIP
Thirdly, navigate to the NevyControl source folder via cd command, and install the tool via PIP: cd envycontrol sudo pip3 install .
Finally, you may use the command below to switch to NVIDIA graphics card (see the pic above): sudo envycontrol -s nvidiaor change nvidia in the code with integrated for Intel or AMD GPU. And, query current graphics mode via envycontrol --query command. A system restart is required however after making a switch! 2. Switch graphic card via System Menu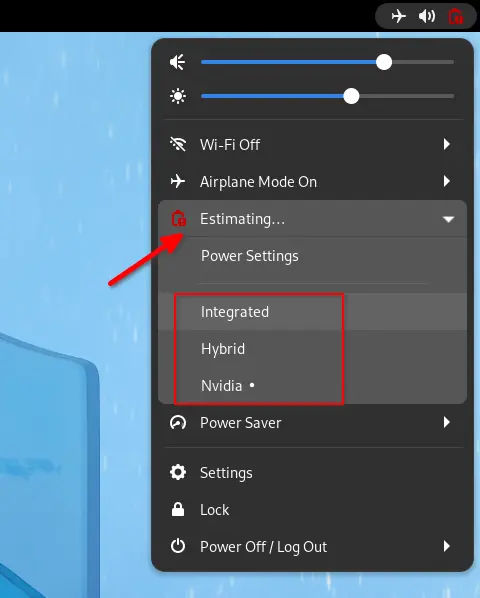 Switch Graphics Mode in System Menu Switch Graphics Mode in System Menu
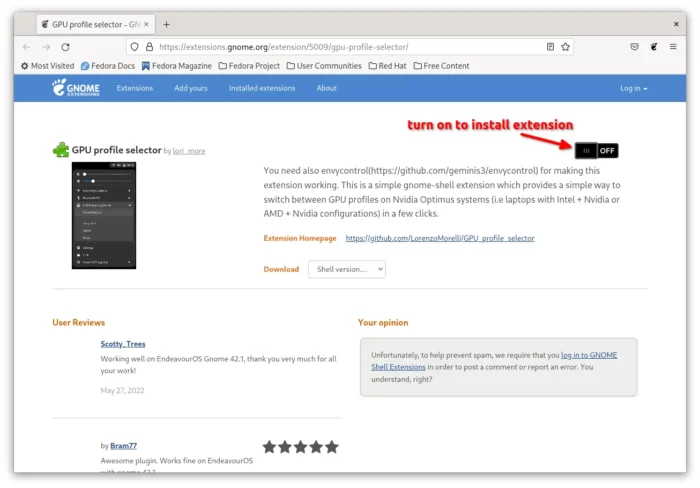
There’s an extension called GPU profile selector allows you to switch between GPUs via the top-right corner system menu. For Fedora Workstation, simply open the link button below and use the on/off switch to install the extension: GPU profile selector for GNOMENOTE: This extension requires the EnvyControl tool in step 1. And, if you don’t see the ON/OFF switch, click the ‘Click here to install browser extension‘ link to install browser extension and refresh the web page.
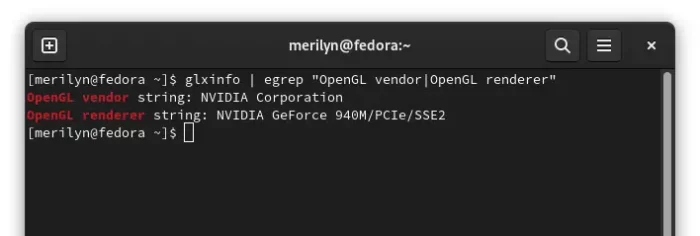
After making switch, you may verify it either by running a single command in terminal window: glxinfo | egrep "OpenGL vendor|OpenGL renderer"
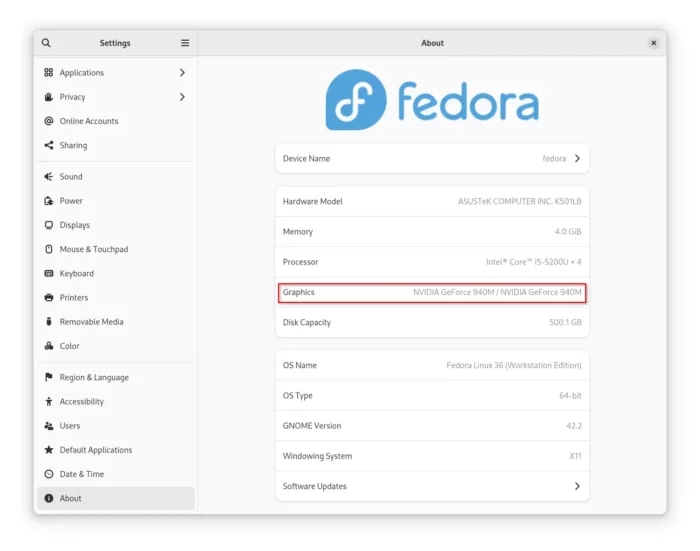
Or, open System Settings (aka Gnome Control Center) and navigate to ‘About’ page. It tells the GPU device name that is in use in ‘Graphics’ line.
|
【本文地址】